Monday, 30 November 2009

STUDIO PHOTOGRAPHY - Umbrella (Brolly)


The brolly modifier gives an even light which is good for seeing the object. The light bounces off the brolly and back onto your subject, diffusing the light as it goes. Raising the brolly higher than the subject gives you less reflections and flares.

STUDIO PHOTOGRAPHY - Beauty Dish


This photograph was taken using a Beauty dish, which gives a radial light evenly from the light source. It is shaped like a dish with a central reflector which reflects the light back into the dish, which then bounces out evenly. The effect is quite soft and moody.

STUDIO PHOTOGRAPHY - Soft Box

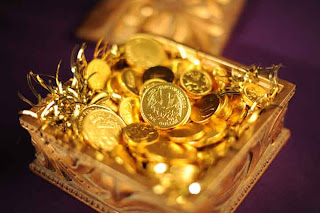
This was taken using a Soft box modifier or diffuser over the light source, which was a Bowens studio flash light. To avoid large areas of flash on reflective subjects you can raise the light source above the object which cuts down reflections.

STUDIO PHOTOGRAPHY - Honeycomb

This photograph was taken in the studio using a Nikon D700 SLR, with a 50mm standard lens, and a Nikon Speedlight 900. I used a Honeycomb modifier which has given a soft, atmospheric light, with a dappled effect. This was taken on f.11 and 1/200th of a second, on ISO 100.

Two Weekly Picture Project

Looking around you when you're driving to work or university in the morning, you see so many people eating their breakfast in their cars, that I decided to recreate a "Dashboard Dining" scene from McDonalds.

Sunday, 29 November 2009

LOCATION PHOTOGRAPHY - Halogen/Tungsten (Site/Work Lamp)

This is an example of Halogen/Tungsten Lighting, which is around 3200 to 3400 degrees Kelvin, an gives a normal to warm glow.

LOCATION PHOTOGRAPHY - Sodium Lighting

This is Sodium Lighting, which you see in the street from street lamps. These give an orange cast to everything including the whites.

LOCATION PHOTOGRAPHY - Fluorescent Light


This is an example of Fluorescent Light from a Fluorescent tube. This is around 6500 degrees Kelvin and gives a cool (or blue) light.

LOCATION PHOTOGRAPHY - Incandescent Light


This is an example of Incandescent Light which is a warm colour light, around 2600 to 2800 degrees Kelvin.

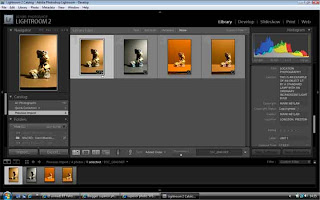
DIGITAL DARKROOM - Write a Caption for at least 1 Photograph in your Lightroom catalogue


This screen grab shows that I have written a caption about this particular photograph in Lightroom (the picture is the one that is highlighted on the screen grab). You can also add a star rating to rate your best pictures if you wish for future reference of your best work.

Saturday, 28 November 2009

CAMERA/LENS TECHNIQUE - Slow Shutter Speed

By using a very slow shutter speed, here I have used 1/80th of a second at f.1.4, you see that the motion of the fan becomes a blur. Very little detail can be seen as all the image blurs into one moving piece.

CAMERA/LENS TECHNIQUE - High Shutter Speed


This is an example of using a fast shutter speed. This fan revolves too fast for the human eye to see the blades when running, but by using a very fast shutter speed, 1/500th of a second at f.1.4, the camera captures the motion, and you can clearly see the three propellers.


CAMERA/LENS TECHNIQUE - Drop Focus Technique


The drop focus technique allows you to focus on a middle (or other) area of your subject whilst using a shallow depth of field, which makes both foreground and background blurred, but your focal point sharp.
This was taken using a Nikon D700 SLR, in studio with Bowens flash units. It was taken on

F.1.4 at 1/80th of a second, using Tungsten lighting and a tripod to avoid camera shake.

CAMERA LENS/ TECHNIQUE - Telephoto

This photograph uses a 70mm focal length, and is the same object as the next picture, except that by using this focal length you can fill the frame with more of your subject than background, and bring the subject closer to you.


CAMERA / LENS TECHNIQUE - Wide Angle

This was taken using 24mm focal length on my lens, which was a 24 - 70mm zoom lens. By using this angle of view, you can get more details in the frame, which may mean buildings, landscape etc.

CAMERA / LENS TECHNIQUE - Shallow depth of field


This is a photograph made using a shallow depth of field, which means that the area at the front of the image is in sharp focus, but beyond this the image blurs out of focus. I took this using a Nikon D700 SLR, with a 50 mm Standard lens, at f8, 1/250th of a second, at ISO 200, using Bowens studio lighting, an brolly and a soft box diffuser.

Monday, 23 November 2009

DIGITAL DARKROOM - Using the Layers Palette in Photoshop CS4

This is how I am constructing my Time Line for History of Image. I am using Adobe Photoshop CS4 to create a layered document. This allows me to import images, set them out where I want them on the page, type in text to talk about them, and ghost images into the background, by reducing the opacity levels between different layers. This is an excellent tool, as it allows you to go back and change or update your work, as long as you save it as a Photoshop Document (To PSD FILE), and not flatten the layers until you are completely happy with it. To post this on blogspot you save it as a Jpg file in 72dpi, and low resolution format.

Thursday, 19 November 2009

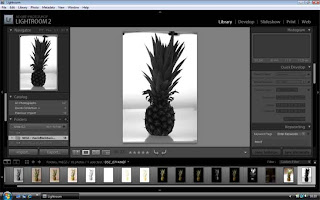
DIGITAL DARKROOM - Demonstrate the action of importing, organising and naming files/folders in Lightroom

This is how you can manage your images using Adobe Lightroom. You import your RAW file images into a folder, and then you can browse through them all at once, make changes such as exposure, change to black and white, change histograms etc etc. Once you are happy with your changes, you then export them back to a file, where you can then open with Photoshop. You manage your files in large format, 300dpi., but for posting on your blog, you save them as 72dpi, for viewing.

Tuesday, 17 November 2009

Two Weekly Picture Project


The first two weekly picture project for this year was called "Time", to be interpreted any way you chose. I decided to capture time in motion by using a very slow shutter speed, 35 seconds, which gives a long exposure. To do this you need to use a tripod to avoid camera shake. I changed the original to Black & White using the Monochrome tool in Photoshop CS4, to show that the images are both interesting in their own right, the colour one being more distracting on the eye since there are several types of light source., but the Monochrome version drawing your eye to the trails.

Sunday, 15 November 2009

FRUIT - BACK LIGHTING


This is an example of Back Lighting, through the light table, which is effectively diffusing the light source. If you didn't use a diffuser the effect would be even more dramatic. You literally put your light source behind the subject. This technique creates silhouettes, giving very sharp outlines, but little detail to the body of the subject itself.

FRUIT - TOP LIGHTING - UNIT 1 / YEAR 1


This is top lighting, which is very dramatic! To achieve this you position the light directly over the subject, which bleaches out the top areas, gradually fading down into contrast, and then disappearing. This is great for theatrical effects, but BEWARE... in daylight circumstances, this is replicating mid day overhead sunshine, and you would need to use a diffuser to avoid an unflattering effect on your subjects.

FRUIT - LOW KEY LIGHTING


This is the exact opposite to High Key, better known as Low Key Lighting. The settings are the same, except that I closed the aperture down to f16, which lets less light into the camera. This effect causes the edges of the image to disappear in to the darker shadowy side, but highlights create perfectly crisp sharp outlines and edges. This is good for masculine or male photography, whereas High key works better with women and babies since it is softer.

FRUIT - HIGH KEY LIGHTING


This is High Key Lighting, which as you can see has bleached out the edges of the subject and made areas of contrast between the blacks and the whites. I changed these photos into black and white using grey scale in Light room, because I feel that for the purposes of this exercise, it shows better the difference between these lighting techniques.
This effect is achieved by opening the aperture of the lens which lets more light into the camera. Here I used the same settings as previously, but f5. If you open the aperture too much the image becomes bleached out and totally over exposed.

FRUIT 45 DEGREE (LEFT)


This is the same as the previous photograph, except that the light was moved to the left hand side, casting the shadows to the right of the subject. I took this series of photographs on a still life table, in a studio, using Bowens studio lights and flash.

FRUIT - 45 DEGREE (RIGHT)

This is an example of 45 degree side lighting, which gives a dark shadow on the opposite side of the pineapple to the light. Here the light was on the right, casting a shadow away to the left. I took this photograph (as all the following) with my Nikon D700, with an 85mm f1.4 Prime lens. This was taken at 125th of a second, on ISO 200, and an aperture of f11. By using this type of light set up you can give your subject contrast, and highlight interesting parts.

Wednesday, 11 November 2009

PRACTICAL SESSIONS - Light Sources


This image was taken by placing a black card or book in front of the soft box, which cuts down any odd reflections on your highly reflective glass object.

PRACTICAL SESSIONS - Light Sources

By adding a reflector above your object you cast the light down again, until you get the desired effect.


PRACTICAL SESSIONS - Light Sources


Different types of light creating different effects.


PRACTICAL SESSIONS - Light Sources


This effect was created by blocking light that would reflect and making the light bounce downwards.

PRACTICAL SESSIONS - Light Sources

Careful positioning of lights with diffusers creates subtle effects.