When you take your photograph you need to use the black and red cape in order that you can see the image to focus correctly, as seen here:
The reason why the cape is red on the outside is so that if you are using it for fieldwork, IE: outside, you are visible from a distance from horses, traffic etc. It is black inside so that you have darkness to see your subject through the rear of the camera.
This is an image of a cheese grater being photographed using a large Cambo camera, I feel that it was very hard to use the Cambo as the picture is upside down left to right etc.... which makes it highly difficult to judge what you are taking and how you are taking it.
A lot of practice is needed to become comfortable and understand the Cambo camera.
I have also experimented in this module using medium format cameras, such as the hasselblad 530 cx, as shown below, and its film similar equivalent type, the Zenza Bronica.
This is the front of a digital medium format Hasselblad 530 cx camera, with a Carl Zeiss Planar 2.8/80 Lens. I did enjoy using this, but compared to using the Nikon D700 which is quick and easy to use, the Hasselblad takes more time to set up, and you need a lot more knowledge of the camera, aperture, exposure and other functions to get the right result.
Using the digital back on the Hasselblad is much easier than using the film back, as with all film work, you need to develop it before you see what the image is like that you have taken, so more care and attention is always required. With the Digital Back or any digital camera, as well as being able to preview you image on the camera itself, you can also use a hot wire to plug into your computer so you can view your image on a full screen size.
This is the film and kit for the Hasselblad. As I said above, the digital back is so much easier, and more compact when packing up your kit.
This is the Bronica, which is my own film camera which I recently acquired, so very much still in practice mode with it. The sheer convenience of the digital Nikon has meant that the film camera is not usually my first choice, as I enjoy and have become accustomed to the instant camera as opposed to cameras which require time to set up and take the perfect image in one shoot. However when I do use it I do gain more satisfaction about the images that are going to be developed due to it being more hands on and that more of my time has been spent thinking about what I am doing, setting the correct exposure times and apertures and so on, thus taking more consideration to create the image.

This is the full kit for the Bronica (minus the red cape which is for the large format) , which consists of the camera, three lenses 80mm (standard), 150mm (Portrait) and 50mm (wide angle), light metre, film spools and the developing spool. The Bronica camera uses a 6*6 film so no matter which way you take the image it is the same size, and from a standard 120 film you get 12 shots.
Large Cambo Images
The following images are fantastic quality due to being larger files and therefore they are clearer, sharper images and the shallow depth of field has worked very well. I am pleased with the outcome of them in relation to my original aims, which included using some of the same/similar techniques to that of Richard Moran who is highlighted within my blog. The reason I like Richard Moran's work and images is the technique of using a shallow depth of field, large format, natural lighting and the finishing in black and white as opposed to colour, which makes his images appear timeless. I have tried to take my images by adapting the same techniques to suit my subject, which involves still life subjects rather than live subjects which Moran includes heavily in his work.

'Whisks' - This was taken using the large Cambo Camera with natural lighting. I used the same technique as in the use of black and white. The capture uses shallow depth of field and high key contrast. I feel that this works well as the background blends with the object.
'Cheese grater' was taken in the same way as the above image. This works because it leads the eye down the object whilst the focus drops and the image becomes blurred into its background, creating interest. The black coating stands out as quite solid against the rest of the image which immediately draws attention.
'Colanders' were again taken using the large Cambo camera, using shallow depth of field and high key contrast. I feel that the reflections of the image stand out to the viewers eye, and helps to define the shaping of the objects.
'Garlic press' was taken in the same way as the other images with the large Cambo camera. The reflections help to define the shape and work as if they are negative spaces. This creates form and repetition.
' Juicer' was taken using natural daylight, large Cambo camera, shallow depth of field , black and white with high key contrast. As with the above objects the reflections work well in defining the shape especially in the centre where it is perfectly symmetrical.
'Egg poacher' was taken as before, using the contrast between light and dark to define its form. This image is defined as much by what you ca see as by the negative spaces.
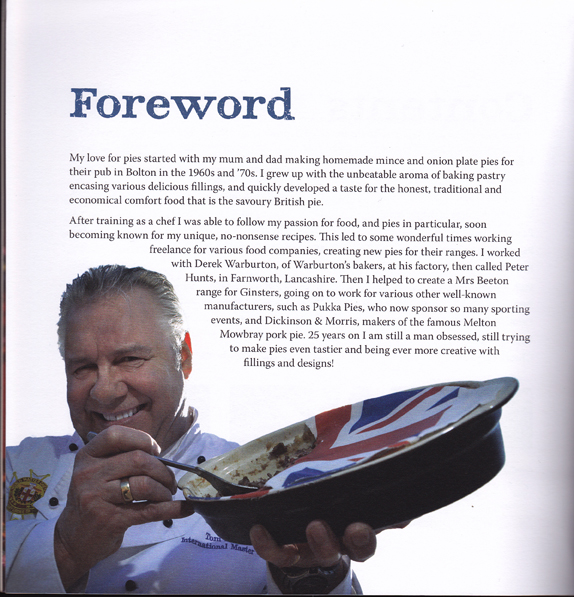
TOM BRIDGE - MASTER CHEF
In undertaking research for this module and my dissertation I have looked at the work of Tom Bridge, who has produced and published to date 20 highly successful cookery books, has appeared on numerous television shows including Richard & Judy, The Big Breakfast and The Great British Bake Off. He trained at The Savoy, and has cooked for many many famous names, including Frank Sinatra, Marie Osmond, Freddie Mercury and David Niven, alongside many European Football Clubs. I interviewed Tom during the launch of his latest success story 'Pie Society', when he talked with me about how he has developed his own Photographic style over several years to compliment his recipes in the manner that he wants to portray.
Pie Society was first published in 2010 by Palatine Books, Lancaster, and sold over 16,000 copies on its launch day. Tom prefers to use natural lighting where possible, using naturally diffused light such as that falling through an orangery or conservatory, or naturally occurring lighting at the scene. Throughout this latest book we see a mix of this type of lighting alongside pleasing background images of, for example Grouse, pleasantly ghosted into the background of a page to illustrate a Famous Grouse pie. We see lovely in situ. shots of sheep with lambs and hens with their flocks, and the use of depth of field to arrange the viewers mind and eye to the subject in hand. Even the use of an empty dish, which, as Bridge says, "tells a complete story of satisfaction".

A Fantastic whole image of a pie using great detail and lifted onto a fun gingham tablecloth background for special effect. |
| Cover, Pie Society by Tom Bridge |
 |
| Foreword page featuring the Chef himself |
 |
| This brilliant image of an empty dish speaks volumes and is a clever technique rarely seen before if at all |
 |
| Lovely images of the animals makes for setting the recipes into context and keeps it all "local" |
 |
| The ghosted Grouse in sepia tones in the background of this recipe page |
 |
Further use of neutralised colour tones for images in the backgrounds of the recipe pages
adds a real depth to this book |
 |
The use of splitting the image between half colour and half neutralised tones gives a lovely finish to this page
adding interest to the viewer, and makes you look in more detail at the subject |
 |
| A lovely image of fresh growing Mint ghosted in to the page with neutralised tones |
Throughout the Pie Society book, Bridge has employed a lovely low key, neutralised tone effect which adds a real feeling to the work, drawing you in to look further at the recipes. It is easy on the eye and gives you a relaxed sense of approach to what is probably quite a difficult art to perfect. Shallow depths of field have been employed alongside some really detailed shots. Colours are neutralised making lovely even tones and a sense of calm throughout.
In a previous recipe book entitled,
What's Cooking Pasta, by Tom Bridge, published by P3 in 2002, we see a different technique employed, still to stunning effect, this time by photographer Iain Bagwell, utilising stunning vibrant colours alongside shallow depths of field, which works equally well, and reflected the style that cookery photography was leaning towards at the end of the 90's and into the noughties. (2000+)
 |
| What's Cooking Pasta, Tom Bridge, 2002 |
 |
Image employing shallow depth of field
What's Cooking Pasta, Tom Bridge 2002 |
 |
| Types of Pasta in detail - a further means of visual effect & communication, What Cooking Pasta, Tom Bridge 2002 |
 |
A lovely image employing careful colour selection, and shallow depth of field
also known as Drop Focus Technique, What's Cooking Pasta, Tom Bridge 2002 |
Richard Moran & His Local Food Heroes
Richard Moran is based in Leeds, West Yorkshire and has made the local food heroes images his own style and work.
"Richard Moran captures images that connect emotionally with audiences. His talent for presenting structure, form and composition is combined with a thorough understanding of brand sensibilities, resulting in a body of work that is always expressive but never melodramatic: the embodiment of everyday life lived to the full."
Moran has produced work for Waitrose, Nigel Haworth at Northcote Manor, The BBC, Lloyd's bank, Mercedes Benz , Opera North and The Church of England.
Quote and further information about the Photographer can be found at the following link:
http://www.moranphoto.co.uk/index.php?/project/portraitfood-heros/
 |
| Image: Richard Moran |
 |
| Image : Richard Moran |
 |
| Image: Richard Moran |
 |
| Image: Richard Moran |
 |
Image: Richard Moran
|
 |
Pizza Express : Richard Moran
I enjoy Moran's work on all fronts from his fashion work to his banking sector and portraiture., but what sets him apart is his use of black and white and high contrast, combined with subtle shifts in depth of field which makes his work so inspirational. It creates images that make the viewer want to linger on the scene, exploring every detail. He often uses compositions which lead the eye into the scene, to become a part of it. Moran's work in Black and white has been the basis inspiration for the style of photography which I have focused on in my brief, taking other aspects from Bridge earlier in terms of story telling and message content. |
COMPETITION ENTRIES
The Landscape Photographer of the Year 2012
 |
| Yorkshire Dales Lightening Tree, M.C.Neylan Copyright 2011 |
In the course of my work I have taken several landscape shots whilst looking at fields farms and flocks and so on. One image which I particularly like is below., and I will be entering this into the Landscape Photographer of the Year awards, which are run in conjunction with the Sunday Times towards the end of the summer 2012 when the call for entries is released. You can enter using the following link:
http://www.take-a-view.co.uk/enternow.aspx
 |
| Farm gate, M.C.Neylan Yorkshire Dales series copyright 2011 |
 |
| Lamb, M.C.Neylan, Copyright 2011 |
 |
| Lamb, M.C.Neylan, Copyright 2011 |
 |
| Barn at Sedbergh, Yorkshire Dales series, M.C.Neylan, Copyright 2011 |
 |
| Barn - as above Portrait view Copyright 2011 |
 |
| Long Road, Yorkshire Dales Series, M.C.Neylan, Copyright 2011 |
 |
| Farm Path to the white cottage, M.C.Neylan, Copyright 2011 |
All my images here where taken using a Nikon D700 with a polarising filter, naturally available daylight, and finished with a custom filter to give them this Aeriel perspective finish.
THE PINK LADY FOOD PHOTOGRAPHER OF THE YEAR COMPETITION 2012
The closing date for entries into this competition is 31 January 2012, and there are various categories under which you can enter. I have chosen to enter Food in the field and Food Portraiture categories.
The details of the competition can be found at the following link:
CAPTURE TECHNIQUES
When considering the images you want to produce, you need to decide on the capture techniques you will use.
One such technique that I tried during my experimental phase was the use of Ambient Flash and Rear Curtain Sync. along with Mixed Lighting:
 |
Mixed Lighting Technique, using Flash and Hyper focal Distance
M.C.Neylan, Copyright 2011 |
HYPER FOCAL DISTANCE & REAR CURTAIN SYNC.
When you want to take a scene where all of the image from front to back is on focus, then you need to set the aperture of the lens to Hyper focal Distance. See the following diagram from Langford's Basic Photography, 8th Edition:
 |
Diagram showing Hyper focal Distance setting on lenses
- Langford's Basic Photography, 8th Edition
|
Basically, set the camera to the infinity symbol, and your focal distance will extend from before to beyond your subject.
 |
Image : Brian Griffin -
Image using Rear curtain Sync.
Use a wide angled lens, low angle of view, usually a featured sky (IE plenty of clouds or contrast), a bolt of flash, high clarity & contrast, low saturation.
Take an ambient meter reading for the depth of field - here at 1/15th sec., f22, flash on auto |
Getting those DRAMATIC SKIES
- Rule of thumb: Use a red filter on Black & White (remember there's a 3 stop penalty!)
- use a wide angle - say 40mm or more
- Choose High contrast for post production & printing
 |
| Long Road, using Red Filter, M.C.Neylan, Copyright 2011 |
Mixed Light Sources
You should always bear in mind the Kelvin Scale when considering lighting. When you look at the image below by Damien Lovegrove where we see a castle light by Tungsten, Fireworks and flash, this needs some consideration. If you are using mixed lighting, the general rule of thumb would be to overexpose. If you are photographing fireworks, firstly compose your image before the fireworks set off., Test the shot to get the subject or backdrop (in this case the castle) lit by the tungsten or other lighting that is available. Use your on camera flash to light the foreground, say f11 2sec.
 |
| Image by Damien Lovegrove |
WAYS OF READING LIGHT LEVELS
There are 3 main ways to read light.
a)
REFLECTED Light Reading - measures the light reflected from the subject using a light meter without the invercone. This is good for average tone subjects such as landscapes.
b)
INCIDENT Light Reading - measures light falling on to the subject using the light meter with the invercone pointing to it - this is good for high contrast subjects and colour transparency film.
c)
GREY CARD - This is a card that is 18% Grey in colour - which is how the camera 'sees'. Place the card on your subject and use a meter or spot meter, or the meter in the camera to measure the light reflected on the card.
TYPES OF METER
Analogue - Good for Black and white film and general uses such as landscape work where ambient light is to be measured
Digital - Great for ambient and flash, and houses the invercone for both incident and reflected readings.
Spot - expensive, but really good as you can select very precise tones and meter them individually., but a grey card is needed with this for accuracy.
On your camera there are various built in Meter Modes, which include: Average, Centre Weighted, Spot, Multispot, Matrix and Evaluative. These can be selected from the selection modes in the camera menu, or from the buttons on the rear in most cases.

Here are two light meters. The left one is analogue, and is good for black and white images, and landscapes were ambient lighting is used. The right one is digital, and my personal favourite as it is easier to use and is a faster way of working which helps when you are spending time setting up. The digital is good to use with cord flash and can house an invercone for incident and reflective readings.
This is an 18% grey card which is used when you want a light reading, to use it you place the grey card in front of the subject/ object and point the camera at it and the light metre in the camera will register, then you set the camera up to the registered light metre reading. This method is usually VERY accurate, as the camera "sees" grey tones only, so this is like talking in the cameras language.
SHOTS FOR FINAL IMAGES & POST PRODUCTION TECHNIQUES
These are some of the images for my final portfolio, which I took using my Nikon D700. My aim was to add a creative twist to everyday objects by use of black and white, depth of field and tonal interest. I have edited out scratches on the steel using adobe CS4, and adjusted the contrast as you would in the darkroom, to make the blacks black and the whites white in my final images which follow.
 |
| Asparagus Kettle, M.C. Neylan Copyright 2011 |
Here I used a Macro lens. The most important aspect of the shoot was to ensure that it was highly polished to help capture the reflection with in the final image.
Producing the image in black and white increases the contrast and defines the images curves and reflections.
 |
| Colanders, M.C.Neylan Copyright 2011 |
This image draws the viewers eyes into it, by placing the smaller Colander inside the larger one. The composition creates depth of field within the image. Again in this image as with the others reflection is highlighted and is a key part of the final photograph, along with the perforations which create a sense of repetition which reduce the sense of mundane kitchen utensil to creative and interesting.
I used a Nikon D700 with a Macro lens, the mixed lighting was Tungsten and daylight, which work well as they bounce off the subject evenly. This image was taken using a tripod and slow shutter speed, and edited to black and white which benefits the final picture as the contrast highlights definition and
curve.
 |
| Corkscrew, M.C.Neylan Copyright 2011 |
This image was taken using a Nikon D700 Digital SLR Camera on f.16, 15 seconds shutter speed. I have added a Vignette using Photo shop as a post production technique.
The use of black and white contrasts against the dark to light background creating a sense of mood. This image was taken using a tripod and automatic cable release.
 |
| Grater, M.C.Neylan Copyright 2011 |
This image was taken using a macro and angle Macro lens 105mm, mixed lighting of daylight and tungsten the camera was based on a tripod f.5.6, ISO 200 @1,2 sec.
I feel that the use of light and dark contrast works very well with this as it highlights the angles on the utensil. The dark creates dramatic mood whilst the light creates definition. The grater itself becomes abstract with texture within the final image.
 |
| Macro Grater, M.C.Neylan Copyright 2011 |
This image was taken using a macro lens 105mm, mixed lighting of daylight and Tungsten, the camera was based on a Tripod f.5.6., ISO 200, 1/2 sec, ISO 200.
The cropped, macro nature of the cheese grater creates an abstract object, which is at a completely different angle and from a wholly new perspective. The use of black and white works well in highlighting the depth of field and texture within the image.
 |
| Juicer, M.C.Neylan Copyright 2011 |
This image was taken using a Polarising filter to flatten reflections at f.16, 15 sec. Mixed lighting of Tungsten and daylight was used which creates contrast within the black and white image.
The
perforations and angles create reflected patterns to the viewers eye which adds interest.
This image was taken using 24-70 mm lens f.16, 10 secs and mixed lighting of Tungsten and daylight.
The product had to be highly polished before the shoot but i feel that the reflections within the kettle really help to make this image what it is.
 |
Kettle, M.C.Neylan, Copyright 2011
|
This image was taken using Black and white High Contrast, I feel that this worked well for the final piece as it helps define the separate parts of the product and highlights its curves.
 |
| Poaching Pan, M.C.Neylan, Copyright 2011 |
'Spoons' were taken using Nikon D700 ,f.5.6, 5 secs, 24-70mm lens telephoto, black and white with increased contrast.
This image works due to the reflections within the pieces as the viewers eye is drawn into the image to see what else is within it. It is also about the use of negative spaces, as there is a sense of yin and yang about the composition.
Again it is vital to have the products highly polished before shooting.
The contrast of light and dark works well in defining and enhancing the shaping and the curves of the utensils.
 |
Spoons & Negative Spaces, M.C.Neylan, Copyright 2011
|
This image was taken using Nikon D700, Macro 105mm lens, f.20, 1.35 sec, ISO 200 black and white.
The viewers eye is drawn by the abstract form due to the composition . The reflections create a
symmetrical pattern of light against dark, the use of black and white helps the curves and defines the shape, and the depth of field blurs out the background in an unusual pattern creating a sense of mood.
 |
Measuring Spoons, M.C.Neylan, Copyright 2011
|
This image was taken using natural lighting Tungsten and daylight with a Nikon D700, 24-70 mm lens.
I like the simplicity of this subject and the tonal values within it.
 |
Cutlery, M.C.Neylan, Copyright 2011
|
This Image was taken using a Nikon d700 F.16, 10 SECS and using mixed lighting of daylight and Tungsten.
 |
| Knife Block, M.C.Neylan, Copyright 2011 |
The black and white adds contrast, and creates a pleasing form to an everyday object.
Pepper pots using a deep depth of field. All in focus front to back, f.20,10 secs, mixed lighting natural and tungsten, I also used a tripod and a reflector.
 |
| Pepper Pots, M.C.Neylan, Copyright 2011 |
I am using these next 2 images to illustrate different depths of filed and the effect this has on the finished image.
Shallow depth of field, front plane in focus105mm fixed lens, ISO 200, f,3,3 sec and mixed daylight.
 |
| Pepper Pots with Shallow depth of field, M.C.Neylan, Copyright 2011 |
PORTFOLIO OF FINAL IMAGES
 |
| All Images Copyright Mark Neylan 2011 |
EQUIVALENT WORD COUNT 4160


 Using the digital back on the Hasselblad is much easier than using the film back, as with all film work, you need to develop it before you see what the image is like that you have taken, so more care and attention is always required. With the Digital Back or any digital camera, as well as being able to preview you image on the camera itself, you can also use a hot wire to plug into your computer so you can view your image on a full screen size.
 This is the Bronica, which is my own film camera which I recently acquired, so very much still in practice mode with it. The sheer convenience of the digital Nikon has meant that the film camera is not usually my first choice, as I enjoy and have become accustomed to the instant camera as opposed to cameras which require time to set up and take the perfect image in one shoot. However when I do use it I do gain more satisfaction about the images that are going to be developed due to it being more hands on and that more of my time has been spent thinking about what I am doing, setting the correct exposure times and apertures and so on, thus taking more consideration to create the image.
 'Colanders' were again taken using the large Cambo camera, using shallow depth of field and high key contrast. I feel that the reflections of the image stand out to the viewers eye, and helps to define the shaping of the objects.


 Here are two light meters. The left one is analogue, and is good for black and white images, and landscapes were ambient lighting is used. The right one is digital, and my personal favourite as it is easier to use and is a faster way of working which helps when you are spending time setting up. The digital is good to use with cord flash and can house an invercone for incident and reflective readings.


No comments:
Post a Comment