Introduction
For this assignment we have been asked to reflect over the 3 years of the course from the beginning to end, and highlight our journey through an exhibition, blog and portfolio.
I would like to start my journey from the work that I placed in a portfolio for my interview to gain a place on the degree, then create a timeline to generate a blog that shows my journey, task's varying genres and my growth as a photographer and the techniques that I have developed in.
Inclusive to the timeline will be a range of photographers that I have researched as I feel that this has played a key part to my work as a photographer, for example, the techniques that I have put into my own practice, different genres that I have inspired to be part of, thus reducing the risk of my work becoming static and very similar to the point of it becoming non interesting to the viewers eye.
In addition to this the research has helped create an awareness of finding that something beautiful in something that at first sight can appear rather bland and ugly. And how to post produce an image to compliment the subject to its highest standard.
The past 3 years I find have been very challenging to my self both as a student and as a commissioned photographer, some briefs and commission's have been very open and ambiguous and it has been an eye opener into how many different images, angles, techniques and post production methods have to be included to capture that one perfect image that has met the need's of the person (s) setting the task.
In turn briefs and commissions that are very restricted and structured I feel can also be just as challenging, this is due to the photographer creating something beautiful and unique to contrast against the image which I sometimes have felt is quite standard, but it is the standard that the customer wants and this can sometimes feel that it goes against the grain of what you are as a photographer, but as the saying goes 'the customer is always right'.
The remainder of my blog will showcase my work and I hope you enjoy viewing my personal journey.
Year 1
Was a year of plenty of introductions into new development's of camera technique's, lighting balances, dark room printing and building up business skills. The year was full of plenty of lectures (including Art History), seminars group tasks and practical sessions, the Set tasks and brief's whole correlated well together to further enhance my understanding of photography in general please see below for images that have been produced as part of year one.
Systems and Processes
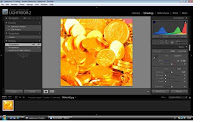
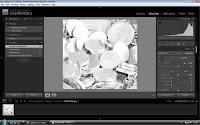
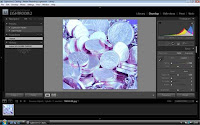
We uploaded images into Lightroom, we altered the tone of the image's through the development menu. If you slide the temperature bar all the way to the left, this makes the image COOL, whereas, if you slide it all the way to the right, this makes the image WARM. You can also see this on the Histogram. The Cool image makes it cold and full of blue tones, and lacking in reds and warm colour, whereas the opposite is true of the warm tones.
The greyscale is produced by clicking the greyscale tab which simply desaturates the image to black and white.
.
Example of an image I took using a soft box diffuser

Snow Location Photography
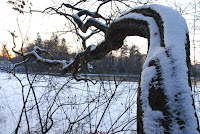
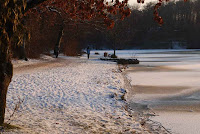
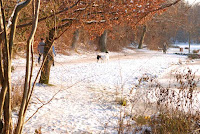
These were taken in Germany before Christmas, when it was minus 20 degrees. The lake had frozen. This was at Magic Hour and I think the light is really special giving a soft glow to the pictures, and avoiding any over exposure issues which you can get with snow being so reflective.
I particularly like the tree the way it is all bent over and twisted, leading the eye to the sunset.
History of Art
During year 1 we attended lectures and seminars that was delivered by lecturer Chris Aughton, I thoroughly enjoyed these lectures for 2 reason's the subject matter was so interesting and relevant to photography and I was completely engaged in the learning as it interested me so much. The second reason was due to the way that it was delivered Chris has a unique style to teaching and I have never enjoyed a lecture as much I enjoyed his he managed to capture both formal and informal at the same time, below are some examples of the history research that I studied.
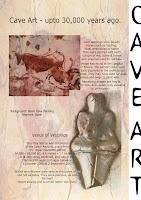 Some of the earliest known art was discovered in Caves where man daubed images on the walls using clays, charcoals and earth colours. For my timeline I am using Layers in Photoshop CS4 to build up images of different genres of art through the ages.
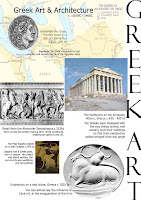 This was a layered image that I created for my time line.
The following is the time line that I created:
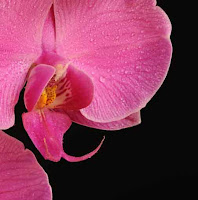
Objects Brief
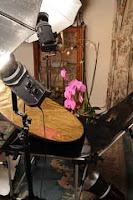
This was my set up for taking an organic form, in this case it was an Orchid. I set it against a black background on a studio still life table, and using a 2 brolly set up at 45 degree angles overhead, and a gold reflector underneath to give it a bit of warmth. The original image was taken with a Nikon D700 SLR, with a 24 - 70mm f.2.8 telephoto lens, at a focal length of 70mm, ISO 200 and an aperture of f.18 and 1/200 the second exposure, using studio flash.

My Creative CV
Part of our year 1 brief was to create a CV that we can use for job vacancies and advertising below is my CV that I created, this has been good to look back on for a reflective piece as my CV has grown alot since then
.

Year 1 AOP Competition entry
Here is my final submission for this years 2010 AOP Student Awards. You can find out more about the Association of Photographers, and the competition itself including previous winners by clicking on this link.

In year 1 we did an objects brief below is some examples of my final images.

People Colour images was directed through both theory and practice this was taught by Andy Farrington below are some of the images that was taken and post produced in practical studio time.During this time we learnt that how you save your image is important, depending on the application it is going to be used for. Saving your image as Adobe RGB is good for greens and colours, so especially good for landscape shots with a lot of green in, sRGB is a good all round file for web viewing, whereas Prophoto is quite flat.


Fine Art Refining Practice Brief
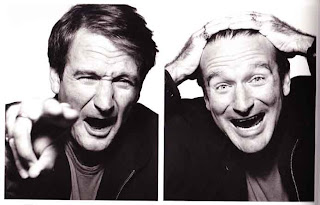
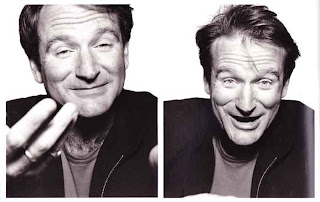
I chose to do self portraits for my fine art, the reason that I have chose to do self portraits is that I feel that this shows emotion, this meaning that I can express my self emotions/feelings more than asking another person to try and show my emotion for me as they can not feel what I am feeling, therefore it is not a true representation of the human condition of emotions whether these be happy, sad, moody, angry and sexy etc...
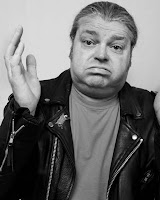
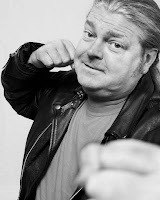
I have chosen to replicate the images of Patrick Demarchelier and his portraits of Robin Williams, as I feel that these are great examples of emotions.
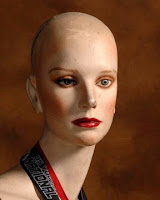
 This is another portrait image from Patrick Demarchelier, although it is different to those of Robin Williams I wanted to include as it I feel that this image is very hard to perceive whether the subject is showing ant emotion at all!!!! The hard to read face which is another major feature which many humans have as a condition. The image was taken by using side lighting this adds to the whole atmosphere (interesting yet menacing).
From this research I tried to replicate the portrayal of the human condition, firstly it was important to get the set up right, below is an example of how I did this.
 This a photograph of the set up that i used for the short lighting method, which leaves a short shadow underneath the nose and under the chin, as opposed to the butterfly/Rembrandt lighting method. I used a Bowens light set up i.e the brolley which is the key light using the flash, which bounces of the silver reflector thus causing the shadow under the nose because the key light is both higher than the subject and in front of the subject. I found that this set up was difficult to set up in order to gain the right shadow and definition as there was a lot of light moving around but I feel that I did in the end master it to a certain extent. All the images were taken using a Nikon D700, with 85mm portrait lens.
I researched different lighting methods these were my findings:
Rembrandt portrait lighting is a name given to the lighting effect that the old masters used to use for the lighting effects in many of his paintings. It's basically short lighting where the shadow from the nose connects with the shadow on the side of the face, thus creating a triangle of light on the short side of the face. If nose and shadow does not connect with the cheek it's not considered to be rembrandt lighting, just short lighting.
Alot of fine art images are finished in black and white it could be suggessted that the final images portray the mood better in black and white than they do in colour.
 http://www.professionalphotography101.com/portrait_lighting_names.html/
My replicated human condition self portraits
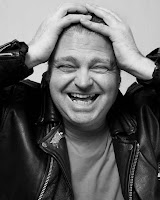


I thoroughly enjoyed this brief self portrait was an area that I had never done before, and I think emotions are evident in all of the images.
Module 2 Unit 5 The Human Condition People
I researched David Bailey for this module
http://www.davidbaileyphotography.com/
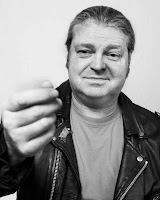
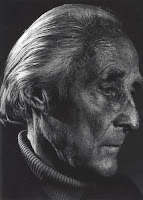
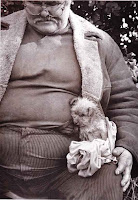
This portrait of Bill Brandt by David Bailey , taken in 1982, is a Bromide print, which fascinates me because it is a side portrait with a huge amount of contrast, and very up close and personal.
A Bromide print is one which uses paper containing Silver Bromide that is sensitive to light.
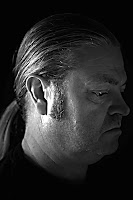 This is take on the previous image of Bill Brandt taken by David Bailey. I have tried to recreate the lighting set up to reflect the very low key effect, using a single tungsten light and a silver reflector in front of the subject. Nikon D700 85mm focal length 85mm Nikon portraiture lens, 1.3 sec at f/3.3 SIO 200.
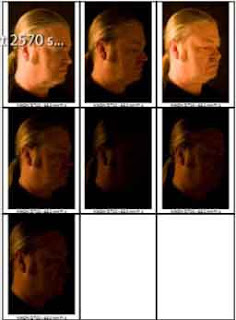
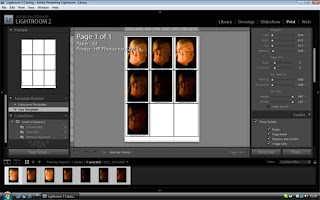
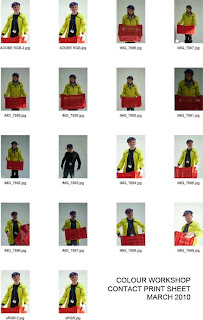
The above contact sheets is were I used Lightroom to organise my images, and them made a contact sheet in order to be able to review what I had taken, and select the images I wanted to work with.
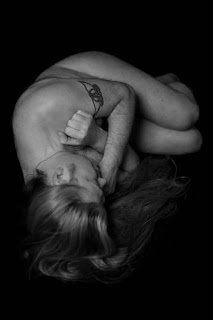 This image is a Fine Art style of Portrait, using a black low key backdrop, and 1/20th second at f1.6 using a 50mm portrait lens. This was a self portrait, which was quite successful because it brings out some of the elements of my character which are not normally visible.
 Here is the contact sheet I made using Photoshop CS3, Automate, Contact sheet II, which is the older version for this task, than CS4 which uses bridge. This allowed me to see which image was the best for my final portfolio, considering contrast, exposure and composition.
Candid People photography series of images
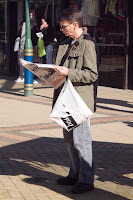
I researched Martin Parr for candid research photography before I took my images,
Martin Parr lives in Bristol his family were ornithologists this developed Parrs observational methods. He was inspired in the 60's by Bill Brandt and Henri Cartier- Bresson. He started his career at the sea-side and developed his prints in black and white, in the 80's he changed to colour and documtented the social hardship that the working class people experienced under the reign of Margerat Thatcher. He now focuses on the perception of everyday day living and is his work is social documentation of this. He has held a number of exhibitions including the Barbican Art Galleery 2002 his work is stated as grotesque, laughable and moving.http://www.pwcinculture.lu/32.0html
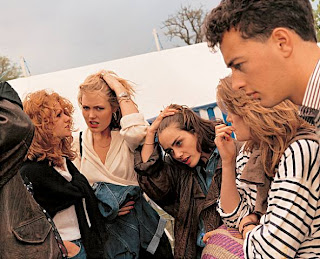
My below images form part of a series which I took around the town using my Fuji Fine Pix S2 ProSLR 35mm lens, combining a range of focal lengths and ISO's were kept as a standard 800 . When taking Candid shots of people, you have to be quite speedy and covert, otherwise they tend to either pose, or walk away if they object to having their photo taken. In order to do this it was necessary to set the camera to Shutter priority since you can never tell when your subject will move, then you may want to capture the action rather than get blurred images.

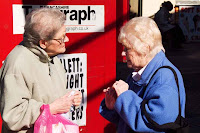
The above image was what I used a my final images for this unit. I used my Fuji FinePix S2Pro once again on Shutter priority, 35-80 mm lens, 72mm focal length, ISO 800, 1/750 sec at f/13. I think it works best in colour because it shows these two as colourful characters, whereas in black and white it adds to their age and takes the humour away from the shot.
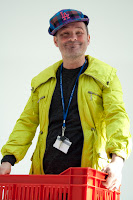
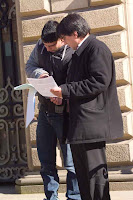
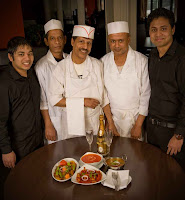
Corporate Portraiture
This brief worked well for my me as a photographer as I was able to incorporate commissioned work with College task work, and I was able to be directed both from my tutor and my client.
I took this image on Nikon d700 with an 85mm f1.4
lense at 1/160 sec at f8 and ISO 400, i used a single light set up with a brolly, with a bowens flash unit head. I like this finished image because it catches the person's ambience as he has paused for the camera.
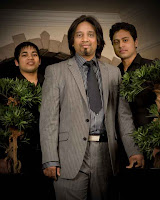
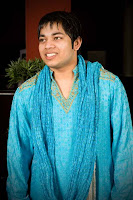 I took this image on a Nikon d700 with 85mm lense on 1/125 sec at f10 ISO/400 i used single light with a brolly and Bowens flash unit. I think that this image captures his traditional dress (culture) Bangladeshi, I like how the blue colour of his dress has showed up really clear and bold. The image appears to have captured his natural look.
 I took this image on a Nikon D700 85 mm lens 1/125 sec
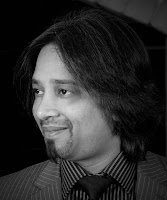
Year 3 I took this image on a Nikon d700 with 85mm lense on 1/125 sec at f10 ISO/400 i used single light with a brolly and Bowens flash unit. I think that this image captures his traditional dress (culture) Bangladeshi, I like how the blue colour of his dress has showed up really clear and bold. The image appears to have captured his natural look. I took this image on a Nikon D700 85 mm lens 1/125 sec
at f.10 i have changed it to black and white using photoshop CS4 as the client wanted a black and white image for his portfolio, the image was also cropped to take out any background images that would distract the viewers eye from the subject.
The man wore stripey tie, a stripey shirt and a stripey suit jacket non of the stripes were the same in colour width or texture, the image being in black and white definitley helped the outcome of the image in terms of contrast.
Below is some research that I conducted before taking my brief images.
.
 I took this image on a Nikon D700 with 85mm lens 1/125 sec f.10, i used a twin light set up using a soft box and the brolley on the Bowen set up, the key light was the brolley on the left hand side. It was all mixed lighting as it was day light and flash, i moved the background plants/trees and used them as props.
 I took this image on a Nikon D700 85mm 1/125 sec f.10 using a twin light set up both the soft box and brolley the brolley was the key light on the left.
Environmental Portraiture
Before carrying out this brief I conducted research on Arnold Newman
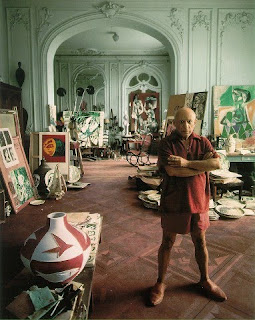 This is an environmental portrait that Newman took of Picasso in his natural working surroundings. I really like this photograph as i think that it is an excellent example of Arnolds work capturing both the true vocation and it definatley exhibits realism of the artists work. The colours of the art work really add to the composure of the image, the deatil on the background walls add to the grandity of the image.
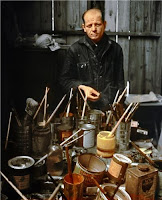 This is another photograph by Arnold Newman of Jackson Pollok I wanted to include this image as it really reflects Polloks environment of all his tins of paint that he used to splash around from, when i seen this photograph i could just imagine him doing his work.
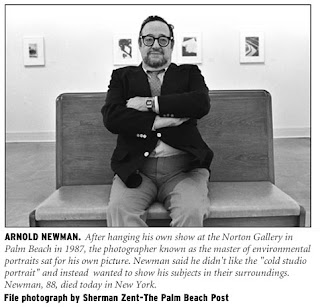 Arnold Newman studied art in 1936


Environmental Portraits
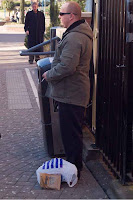
I enjoyed this brief as the images can be very misleading to the viewers please see my images below:
 This is an image that I scanned I like it as it is like it has captured a homeless person in his environment, if the man is not homeless then the image is leading that train of thought.
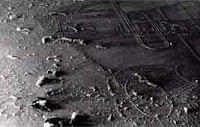
Places introduction Alien Landscape
For example; this image, "Dust Breeding", by Man Ray shows an "alien" landscape as Man Ray wanted us to see it, but in fact it is a macro shot of dust.
You can view more of Man Ray's work at the following web link:
http://www.manray-photo.com/catalog/index.php
To capture the character of a place as you see it, and wanted to portray it may not always be true, but is dependant on the way you take your picture, and how you use the lighting, be it natural or added, the different lenses you use IE; wide angle will give you a sense of space, depth of field to give you perspective.
Contact sheets are really useful as a tool to be able to see all your images at once, to be able to choose your best image for your final portfolio.
I made this contact sheet using Photoshop CS4 Bridge, then selected the images I wanted in the sheet. From this I can now choose my best images.
.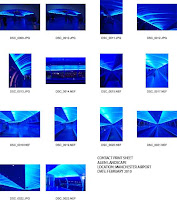
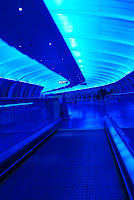
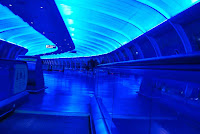
Here are a selection of my images for the alien or foreign environment which I took at Manchester airport , very early in the morning whilst it was still dark, to give the impression that you are on a spaceship, since it struck me that this was not unlike a spaceship that you see in the movies. The light interested me, because it gives you a sense of calmness because of the blue, cool tones. Because of the curve, IE; leading the eye, you can't wait to see whats around the next corner. I used a Nikon D80 SLR here, ISO 1600 to capture any light trails and give a grainy effect because it is more sensitive to light capture. I used an 18 - 55mm short telephoto lens to allow me to alter my focal length depending on the image I wanted to create, and also this gave me a
Places a familiar place brief
I enjoyed taking the below images for this brief as my familiar place is the comfort of my garage of which holds all my life long treasures..... going through all my things again to find the perfect objects was a fun time and very nostalgic.
 CONTACT SHEETS
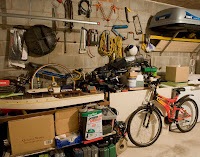 This is one of my favourite places. It might look like chaos to anyone else, but to me its my own organised chaos. I took this on a Nikon D700 SLR with a 24 - 70mm lens, focal length was 24mm, f.10/ 0.6 second on ISO 800, using a 200 watt Tungsten light.
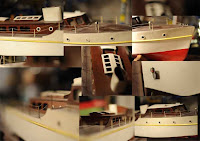 As part of my garage series of images of a familiar or significant place, this is a boat that I built as a boy. Throughout this brief I am using connecting lines to create images from a collection of other images. This leads the eye to different places within your image.
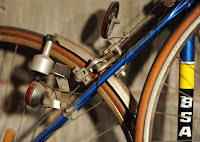 This is the first bike I bought with my first wage packet, which cost me £21, 32 years ago!
I like the composition of this image as the blue line takes your eye to the BSA logo, and the wheels cut the page in the rule of thirds. This was a Tour de France special bike with the trademark racing yellow and blue paint. Taken with a Nikon D700 DSLR, using a studio tungsten bulb, with the overhead 200watt bulb which gives a double shadow. f1.4, 1/100th of a second, ISO 800 and 85mm focal length lens.
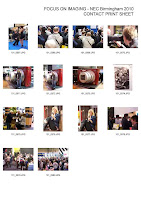
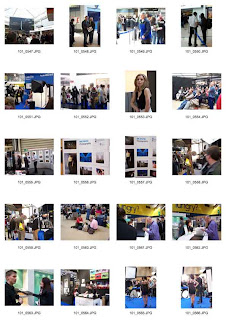
Part of being a photography student is to attend galleries and exhibitions below is some contact sheets from
the Birmingham NEC Exhibition that I attended.
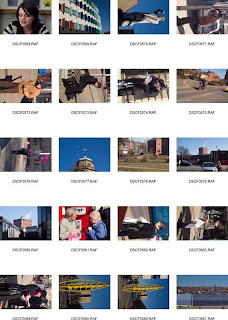
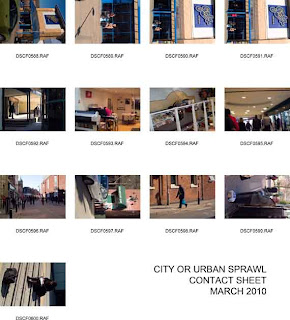
Places Urban Scrawl Brief
Below are my Contact Print Sheets for the City or Urban Sprawl unit. I went out around Blackburn town centre and took random candid shots using my fuji finepix nikon 35-80 mm short tele photo lens, which was the most suitable for different focal points when you don't have the opportunity to keep changing lenses. I also used a polarising filter to get deeper sky colours as it was good sunny day. When you use a Polarising filter, you need to adjust your aperture by a couple of stops for non sky work as otherwise your images will be under exposed
.
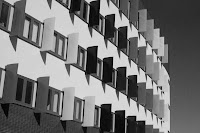
 This was one of my final images for this unit. I chose to take this building because it has now become an icon in the Blackburn landscape. Having changed the image to black and white I have decided it should be in colour because it has more character and blends with the sky. This was taken on my fuji finepix and 35 -80 mm lens 42mm Length ISO 800 1/1000 sec f/16 using a Polarising Filter. I used Photoshop CS4, lens correction filters to straighten the building line as I got Parallax error when I took the photograph
.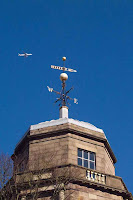 I liked this image of another of the defining landmarks in Blackburn. I think that the aeroplane looks odd because its not pointing quite the same way as the weather vane, but I like this image overall. This was taken with a Fuji Fine Pix S2Pro DSLR and a polarising filter on 51mm focal lens , 1/1750 sec f/ 13 ISO 800
.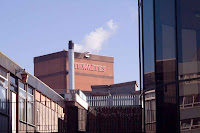
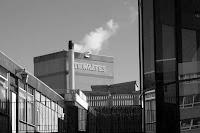 This photograph looks like it is made up of several images, because there is the old Thwaites chimney and factory, the working mans pub in the foreground and the modern glass building to the right, so overall I like the mix of times in the photo. This was taken on fuji fine pix , ISO 800 f/11 and shutter speed 1/500th second 35-80mm lens focal length 79 mm . I think this image works better in black and white because it adds to the feel of time.
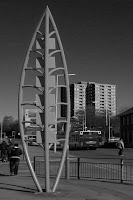

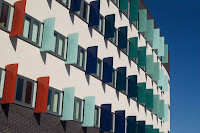
This was one of my final images for this unit. I like the weird composition from this awful combination of the bright yellow banana statue in the middle of the pavement, and the way that the council have sensitively painted the window boxes of the flats the same shade! Yellow and blue work well in this composition so I think the colour version is the better of the two.
This was taken on fujifinepix 35mm f/16with a polarising filter ISO 800 and 1/125th second.
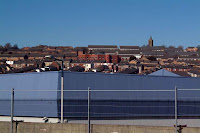 This image works because the sky and the building kind of act like layers sandwiching the town in between them. A series of images like this could possibly work as another complete project. Taken on fujifinepix with a 79mm lens using the widest angle. Shutter speed 1/125th, ISO 800 f/ 16 and a Polarising filter fro added saturation of the sky.
Wilderness/Countryside
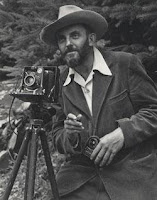
For the next brief I researched Ansel Adams and his use of Large Format camera's as this is how I wanted to take my images. I enjoyed shooting the images for this brief being out in the countryside looking for the beauty in the peaceful natural beauty I found very calming and realxing.
.jpg) http://www.google.co.uk/search?hl=en&source=hp&q=ansel+adams+photography&meta=&aq=0&aqi=g10&aql=&oq=ansel+adams&gs_rfai==
http://www.google.co.uk/search?hl=en&source=hp&q=ansel+adams+photography&meta=&aq=0&aqi=g10&aql=&oq=ansel+adams&gs_rfai==
By Gone Times
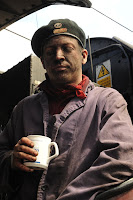
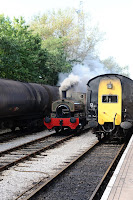
This was my ultimate favourite brief I have been interested in steam trains since I was little, they have been a mass hobby of mine, so for me to be able to go and research the running of the trains today take pictures and speak to the workmen was one of the best moments of my life.
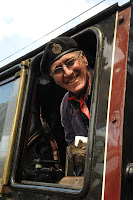 This image was taken for the pecha kucha brief, I chose to do steam trains as it is a great passionate hobby and interest of mine. This is one of the portraits I took of the steam driver, he is in his 80,s and he was the chief driver of the Duchess of Sutherland he does this as a volunteer, there are no longer any steam train drivers that are paid employees any more.
.jpg)
The man wore stripey tie, a stripey shirt and a stripey suit jacket non of the stripes were the same in colour width or texture, the image being in black and white definitley helped the outcome of the image in terms of contrast.
Below is some research that I conducted before taking my brief images.
.
I took this image on a Nikon D700 with 85mm lens 1/125 sec f.10, i used a twin light set up using a soft box and the brolley on the Bowen set up, the key light was the brolley on the left hand side. It was all mixed lighting as it was day light and flash, i moved the background plants/trees and used them as props.
I like this image as it makes him look suave and sophisticated trying to capture his percieved personality and I feel that the image contrasts really well.
I took this image on a Nikon D700 85mm 1/125 sec f.10 using a twin light set up both the soft box and brolley the brolley was the key light on the left.
I like this image they look well together and the trees/plants again make a good prop for the set up. Again i feel that the colours are contrasting.
Environmental Portraiture
Before carrying out this brief I conducted research on Arnold Newman
This is an environmental portrait that Newman took of Picasso in his natural working surroundings. I really like this photograph as i think that it is an excellent example of Arnolds work capturing both the true vocation and it definatley exhibits realism of the artists work. The colours of the art work really add to the composure of the image, the deatil on the background walls add to the grandity of the image. This is another photograph by Arnold Newman of Jackson Pollok I wanted to include this image as it really reflects Polloks environment of all his tins of paint that he used to splash around from, when i seen this photograph i could just imagine him doing his work.Arnold Newman studied art in 1936
at the University of Miami, he develpoed his photography when he started as an apprentice photographer. He was influenced by The Farm Security Administration and magazines such as Vanity Fair, his images reflect the subjects vocation and portray realism.
He was quoted as saying " we don't take photographs with our cameras, we take them with our hearts and minds. They are a reflection of ourselves, what we are, and what we think" (cited http://www.artgallery.com/) He printed his images in Black and White silver gelatin and used a 4*5 view camera on a tri-pod he later started use a srl 35mm , Newman used natural light for his images. http://www.agallery.com/pages/photgraphers/newman.html
My images Environmental Portraits
My images Environmental Portraits


Environmental Portraits
I enjoyed this brief as the images can be very misleading to the viewers please see my images below:
This is an image that I scanned I like it as it is like it has captured a homeless person in his environment, if the man is not homeless then the image is leading that train of thought.Places introduction Alien Landscape
For this brief I intended to show the character of various places through the medium of photography. The photographer has to show what he sees to the viewer, and project his thoughts which might not neccessarily be the truth, for example, the Alien landscape images I took do not actually show that you are on a spaceship, or an alien planet, but merely put across the sense of what I saw as an alien environment.
For example; this image, "Dust Breeding", by Man Ray shows an "alien" landscape as Man Ray wanted us to see it, but in fact it is a macro shot of dust.
You can view more of Man Ray's work at the following web link:
http://www.manray-photo.com/catalog/index.php
To capture the character of a place as you see it, and wanted to portray it may not always be true, but is dependant on the way you take your picture, and how you use the lighting, be it natural or added, the different lenses you use IE; wide angle will give you a sense of space, depth of field to give you perspective.
Contact sheets are really useful as a tool to be able to see all your images at once, to be able to choose your best image for your final portfolio.
I made this contact sheet using Photoshop CS4 Bridge, then selected the images I wanted in the sheet. From this I can now choose my best images.
.
Here are a selection of my images for the alien or foreign environment which I took at Manchester airport , very early in the morning whilst it was still dark, to give the impression that you are on a spaceship, since it struck me that this was not unlike a spaceship that you see in the movies. The light interested me, because it gives you a sense of calmness because of the blue, cool tones. Because of the curve, IE; leading the eye, you can't wait to see whats around the next corner.
 I used a Nikon D80 SLR here, ISO 1600 to capture any light trails and give a grainy effect because it is more sensitive to light capture. I used an 18 - 55mm short telephoto lens to allow me to alter my focal length depending on the image I wanted to create, and also this gave me a
Places a familiar place brief
I enjoyed taking the below images for this brief as my familiar place is the comfort of my garage of which holds all my life long treasures..... going through all my things again to find the perfect objects was a fun time and very nostalgic.
CONTACT SHEETS
Here are the contact sheets of my photo shoot of the above brief title.
Contact sheets are a good idea so that you can look and pick the best photographs to use from one place.
This is one of my favourite places. It might look like chaos to anyone else, but to me its my own organised chaos. I took this on a Nikon D700 SLR with a 24 - 70mm lens, focal length was 24mm, f.10/ 0.6 second on ISO 800, using a 200 watt Tungsten light. As part of my garage series of images of a familiar or significant place, this is a boat that I built as a boy. Throughout this brief I am using connecting lines to create images from a collection of other images. This leads the eye to different places within your image. This is the first bike I bought with my first wage packet, which cost me £21, 32 years ago!I like the composition of this image as the blue line takes your eye to the BSA logo, and the wheels cut the page in the rule of thirds. This was a Tour de France special bike with the trademark racing yellow and blue paint. Taken with a Nikon D700 DSLR, using a studio tungsten bulb, with the overhead 200watt bulb which gives a double shadow. f1.4, 1/100th of a second, ISO 800 and 85mm focal length lens.
Part of being a photography student is to attend galleries and exhibitions below is some contact sheets from
the Birmingham NEC Exhibition that I attended.
Places Urban Scrawl Brief
Below are my Contact Print Sheets for the City or Urban Sprawl unit. I went out around Blackburn town centre and took random candid shots using my fuji finepix nikon 35-80 mm short tele photo lens, which was the most suitable for different focal points when you don't have the opportunity to keep changing lenses. I also used a polarising filter to get deeper sky colours as it was good sunny day. When you use a Polarising filter, you need to adjust your aperture by a couple of stops for non sky work as otherwise your images will be under exposed
.
This was one of my final images for this unit. I chose to take this building because it has now become an icon in the Blackburn landscape. Having changed the image to black and white I have decided it should be in colour because it has more character and blends with the sky. This was taken on my fuji finepix and 35 -80 mm lens 42mm Length ISO 800 1/1000 sec f/16 using a Polarising Filter. I used Photoshop CS4, lens correction filters to straighten the building line as I got Parallax error when I took the photograph.
I liked this image of another of the defining landmarks in Blackburn. I think that the aeroplane looks odd because its not pointing quite the same way as the weather vane, but I like this image overall. This was taken with a Fuji Fine Pix S2Pro DSLR and a polarising filter on 51mm focal lens , 1/1750 sec f/ 13 ISO 800.
This photograph looks like it is made up of several images, because there is the old Thwaites chimney and factory, the working mans pub in the foreground and the modern glass building to the right, so overall I like the mix of times in the photo. This was taken on fuji fine pix , ISO 800 f/11 and shutter speed 1/500th second 35-80mm lens focal length 79 mm . I think this image works better in black and white because it adds to the feel of time. This was one of my final images for this unit. I like the weird composition from this awful combination of the bright yellow banana statue in the middle of the pavement, and the way that the council have sensitively painted the window boxes of the flats the same shade! Yellow and blue work well in this composition so I think the colour version is the better of the two.
This was taken on fujifinepix 35mm f/16with a polarising filter ISO 800 and 1/125th second.
This image works because the sky and the building kind of act like layers sandwiching the town in between them. A series of images like this could possibly work as another complete project. Taken on fujifinepix with a 79mm lens using the widest angle. Shutter speed 1/125th, ISO 800 f/ 16 and a Polarising filter fro added saturation of the sky.Wilderness/Countryside
For the next brief I researched Ansel Adams and his use of Large Format camera's as this is how I wanted to take my images. I enjoyed shooting the images for this brief being out in the countryside looking for the beauty in the peaceful natural beauty I found very calming and realxing.
http://www.google.co.uk/search?hl=en&source=hp&q=ansel+adams+photography&meta=&aq=0&aqi=g10&aql=&oq=ansel+adams&gs_rfai==
Ansel Adams (1902-84), his photographs were first published in 1921 Ansel wanted his images to show close up detail and the best view points. He had a 60 year career which included large forms and factories these were taken on a view camera, which is a large format camera.
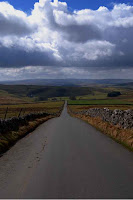 I took this image on Nikon D80, using a 18-55mm f3.5- 5.6 lense focal length 31 mm f/ 9.0 at 1/320 sec on ISO 125 using a polarising filter. I feel that i took this like an Ansel Adams and there was no other cars on the road, so I used the road as leading line, I am quite pleased with the image as I feel that the clouds give the image dramatics.
.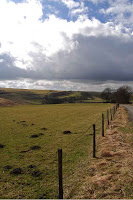 I took this image on a D80, 18-55 mm short telephoto lense, focal length 18mm f/9.0 1/320 sec ISO 125. I used the fence as leading line for the image as it divides the picture into thirds.
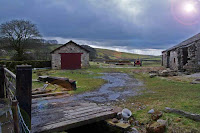 I took this photograph on a Nikon D80. focal length 18mm -55mm, 1/160 SEC f/6.3ISO 125. This photograph was took because I thought that the composition was interesting with the tractor in the background. It shows the image running down the side of the dilapidated farm in the Dales the sun flare was left in the image as I feel that it adds to the overall finish.
I took this image on Nikon D80, using a 18-55mm f3.5- 5.6 lense focal length 31 mm f/ 9.0 at 1/320 sec on ISO 125 using a polarising filter. I feel that i took this like an Ansel Adams and there was no other cars on the road, so I used the road as leading line, I am quite pleased with the image as I feel that the clouds give the image dramatics..
I took this image on a D80, 18-55 mm short telephoto lense, focal length 18mm f/9.0 1/320 sec ISO 125. I used the fence as leading line for the image as it divides the picture into thirds. I took this photograph on a Nikon D80. focal length 18mm -55mm, 1/160 SEC f/6.3ISO 125. This photograph was took because I thought that the composition was interesting with the tractor in the background. It shows the image running down the side of the dilapidated farm in the Dales the sun flare was left in the image as I feel that it adds to the overall finish.By Gone Times
This was my ultimate favourite brief I have been interested in steam trains since I was little, they have been a mass hobby of mine, so for me to be able to go and research the running of the trains today take pictures and speak to the workmen was one of the best moments of my life.
This image was taken for the pecha kucha brief, I chose to do steam trains as it is a great passionate hobby and interest of mine. This is one of the portraits I took of the steam driver, he is in his 80,s and he was the chief driver of the Duchess of Sutherland he does this as a volunteer, there are no longer any steam train drivers that are paid employees any more.
The image was taken on DSLR Nikon d700 using 24-70 mm telephoto lens, ISO 1600 I used this to get as much grain into the image as possible as I thought that it was fitting with the grubbiness of the image 1/100 sec at f/22.
 This image was taken using DSLR 700, iso 1600, focal length of 60 mm, exposure was 1/125 sec at f/18. This was to show just how dirty the train drivers get.
 This image was taken using ISO1600, 1/80 SEC F/4 with the image being taken on the inside by using the ISO 1600 it was able to capture any available light.
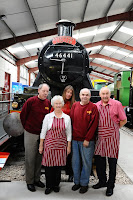 This image was taken using a DSLR 700, 35mm focal length, ISO 4000, 1/125 at f/6.3. I shot this image as it shows the team of the museum all of which are volunteers.
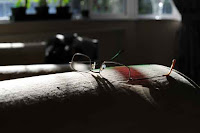
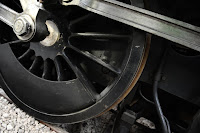 I took this picture as i like how it show's the elements of the wheel, the emphasis of the image is to show that steam trains run on steel wheels.
This image was taken using DSLR 700, iso 1600, focal length of 60 mm, exposure was 1/125 sec at f/18. This was to show just how dirty the train drivers get. This image was taken using ISO1600, 1/80 SEC F/4 with the image being taken on the inside by using the ISO 1600 it was able to capture any available light. This image was taken using a DSLR 700, 35mm focal length, ISO 4000, 1/125 at f/6.3. I shot this image as it shows the team of the museum all of which are volunteers. I took this picture as i like how it show's the elements of the wheel, the emphasis of the image is to show that steam trains run on steel wheels.
The image was taken using a DLSR 700, ISO 4000, focal length 24mm, 1/100 at f/2.8. I feel that the picture gives a good close up range.
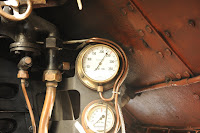
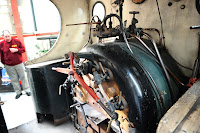 This is a photograph of the inside of a tender which is to be restored. I like this image because it show's the workings and the pipe work of the boiler before its restored therefore it is in its dilapidation.
This is a photograph of the inside of a tender which is to be restored. I like this image because it show's the workings and the pipe work of the boiler before its restored therefore it is in its dilapidation.
The image was taken using a DSLR 700, ISO 4000, focal length 24mm, 1/100 sec at f/2.8.
 This is an external view of the fire tender that is to be restored, this shows the external dilapidation of the paint work and the project to be getting on with.
This is an external view of the fire tender that is to be restored, this shows the external dilapidation of the paint work and the project to be getting on with.
The image was taken using a DSLR 700, focal length 27mm, ISO 800, 1/100 sec at f/5.6.
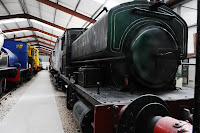
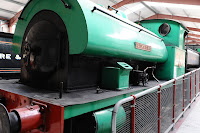 This is a photograph of a fully restored engine I like this image because it shows the finished product after work has been carried out on it which in some cases takes years.
This is a photograph of a fully restored engine I like this image because it shows the finished product after work has been carried out on it which in some cases takes years.
The image was taken using DSLR 700, ISO 4000, focal length 32 mm, 1/80 sec at f/6.3.
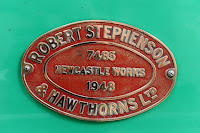 This is a photograph of the engine name plate that has just been restored showing that the steam engine was built in 1948 in Newcastle by Robert Stephenson and Hawthorns Ltd. I like the image because the actual name plate is a piece of history highlighting when it was made and the number 7458 is it's registration number.
This is a photograph of the engine name plate that has just been restored showing that the steam engine was built in 1948 in Newcastle by Robert Stephenson and Hawthorns Ltd. I like the image because the actual name plate is a piece of history highlighting when it was made and the number 7458 is it's registration number.
The image was taken using a DSLR 700, ISO 4000, focal length 50 mm, 1/80 at f/6.3.
 This is a photograph of a small tender coming up the tracks to pull the carriages, I like this image because the steam creates movement it looks like an old dinosaur working.
Year 2
My Year 2 blog is going to be smaller than year 1 this is due to myself collaborating some of the set briefs with commissioned work and due to copyright reason's and the companies ownership of the images that I produced I cannot place them on my blog for public viewing.
The images that I can place on my blog are as follows:
Advertising Brief
My advertising brief was to produce work for a reputable food company/ packaging company, by producing images for them. I had to research the current packaging and advertising market. Meet with the directors of the company and discuss what they were hoping to gain out of the finished images, collaborate with Helen Neylan who did sketch images and the setting up of the meetings, post production images and graphic design.
I met with the workers and talked about their job roles and the best parts of the day, and I then returned on a number of occasion's at different times of the day to photograph the grass roots of the company, this took up alot of working hours and there was alot of camera techniques learnt through this brief.
The outcome was that we designed the new packaging, Banners and Board room images, it was a very successful commisioned work/ brief.
Unfortunately due to copyright These are the images that I cannot place on my blog.
Historical moment that has influenced fashion today brief
This was a 5000 word equivalent brief I decided to concentrate on the punk era and more importantly Vivienne Westwood and Malcom McLaren.


My Fashion Brief
The fashion brief was very much out of my comfort zone it is not a genre that I have ever thought of being a part of as a photographer. So I did struggle with the brief, however I had an excellent model who did make taking the images slightly easier. The images were taken on location in a wedding shop this helped my brief alot because as a man I am not all that clued up on what is relevant modern fashion, I learnt alot about lighting, dressing and directing on this brief.


.jpg)
This is a photograph of a small tender coming up the tracks to pull the carriages, I like this image because the steam creates movement it looks like an old dinosaur working.
The image was taken using a DSLR 700, ISO 800, focal length 70mm, exposure 1/100 sec at f/14.
 This is a photograph of the train pulling away that's a memory in all children's minds of an epic journey that they once had, I like this because it brings back childhood memories.
This is a photograph of the train pulling away that's a memory in all children's minds of an epic journey that they once had, I like this because it brings back childhood memories.
The image was taken using a DSLR 700, ISO 800, focal length 70 mm, 1/160 sec at f/5.6.
Phew year 1 was a very busy year practically I have enjoyed gathering all the blog images and reflecting over my journey.
Phew year 1 was a very busy year practically I have enjoyed gathering all the blog images and reflecting over my journey.
Year 2
My Year 2 blog is going to be smaller than year 1 this is due to myself collaborating some of the set briefs with commissioned work and due to copyright reason's and the companies ownership of the images that I produced I cannot place them on my blog for public viewing.
The images that I can place on my blog are as follows:
Advertising Brief
My advertising brief was to produce work for a reputable food company/ packaging company, by producing images for them. I had to research the current packaging and advertising market. Meet with the directors of the company and discuss what they were hoping to gain out of the finished images, collaborate with Helen Neylan who did sketch images and the setting up of the meetings, post production images and graphic design.
I met with the workers and talked about their job roles and the best parts of the day, and I then returned on a number of occasion's at different times of the day to photograph the grass roots of the company, this took up alot of working hours and there was alot of camera techniques learnt through this brief.
The outcome was that we designed the new packaging, Banners and Board room images, it was a very successful commisioned work/ brief.
Unfortunately due to copyright These are the images that I cannot place on my blog.
Historical moment that has influenced fashion today brief
This was a 5000 word equivalent brief I decided to concentrate on the punk era and more importantly Vivienne Westwood and Malcom McLaren.
The reason that I chose this era is because I feel that Punk has influenced many of the fashion from then to now also it was a rise against the conformity that was being placed upon the people in that moment of history under the reign of Margaret Thatcher.Vivienne Westwood is still a very iconic designer and still has the influences of her Punk era in her design's today.
The research and images that I found was placed in a scrap book so unfortunately I can not place them on my blog.
My Fashion Brief
The fashion brief was very much out of my comfort zone it is not a genre that I have ever thought of being a part of as a photographer. So I did struggle with the brief, however I had an excellent model who did make taking the images slightly easier. The images were taken on location in a wedding shop this helped my brief alot because as a man I am not all that clued up on what is relevant modern fashion, I learnt alot about lighting, dressing and directing on this brief.
Professional Practice Brief Final Images
I enjoyed this brief as it went hand in hand with my food photography as there are many varying to food in the kitchen/ home plus I stretched my techniques and moved away from my comfort zone which is my god 'the Nikon D700' and took the below images with a large Cambo Camera. Although this was more time consuming and difficult to do I am pleased that I did this as I really enjoyed working with the new equipment, and I feel that final images turned out well.


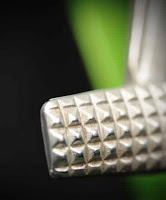
'Whisks' - This was taken using the large Cambo Camera with natural lighting. I used the same technique as in the use of black and white. The capture uses shallow depth of field and high key contrast. I feel that this works well as the background blends with the object.

'Cheese grater' was taken in the same way as the above image. This works because it leads the eye down the object whilst the focus drops and the image becomes blurred into its background, creating interest. The black coating stands out as quite solid against the rest of the image which immediately draws attention.


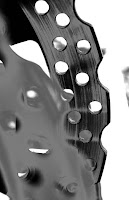
'Garlic press' was taken in the same way as the other images with the large Cambo camera. The reflections help to define the shape and work as if they are negative spaces. This creates form and repetition.

' Juicer' was taken using natural daylight, large Cambo camera, shallow depth of field , black and white with high key contrast. As with the above objects the reflections work well in defining the shape especially in the centre where it is perfectly symmetrical.

'Egg poacher' was taken as before, using the contrast between light and dark to define its form. This image is defined as much by what you ca see as by the negative spaces.
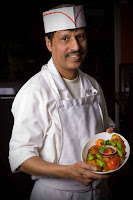
Whilst doing my dissertation I conducted both secondary and primary research on Tom Bridge who has been a successful chef for over 30 years and has masses of experience in relation to publishing successful cook books, along side fellow Chefs such as Jamie Olive. I feel that this helped me gain the above images in understanding what worked for both the seller and the target audience. Also through the dissertation I gained a great insight into the Psychology behind advertising and Images, what sells what does not, who you are aiming your product at, it also taught me great communication skill's for discussing the need's of the Chef's. I really enjoyed the dissertation as it was close to my passion and I feel that I learnt a lot about management and business skills as a food photographer.


Part of being a year 3 student was to enter some of your personal best images into various competitions below are the images that I selected and entered, I feel that these images are some of my strongest as they are the fields of photographer which I am personally most drawn to for a professional career.
COMPETITION ENTRIES
The Landscape Photographer of the Year 2012
 |
| Yorkshire Dales Lightening Tree, M.C.Neylan Copyright 2011 |
http://www.take-a-view.co.uk/enternow.aspx
 |
| Farm gate, M.C.Neylan Yorkshire Dales series copyright 2011 |
 |
| Lamb, M.C.Neylan, Copyright 2011 |
 |
| Lamb, M.C.Neylan, Copyright 2011 |
 |
| Barn at Sedbergh, Yorkshire Dales series, M.C.Neylan, Copyright 2011 |
 |
| Barn - as above Portrait view Copyright 2011 |
 |
| Long Road, Yorkshire Dales Series, M.C.Neylan, Copyright 2011 |
 |
| Farm Path to the white cottage, M.C.Neylan, Copyright 2011 |
THE PINK LADY FOOD PHOTOGRAPHER OF THE YEAR COMPETITION 2012
The closing date for entries into this competition is 31 January 2012, and there are various categories under which you can enter. I have chosen to enter Food in the field and Food Portraiture categories.
The details of the competition can be found at the following link:
 |
| Baby Spinach, M.C.Neylan, Copyright 2011 |
 |
| Harvesting time, M.C.Neylan, Copyright 2011 |
 |
| Red Chard, M . C. Neylan, Copyright 2011 |

Great inspiration to myself as a food photographer is Richard Moran I feel that he has taken an ever changing target audience due to such a diverse society and economic changes and has captured food images that most people can relate to, and would like to receive such quality from the food that they are about to consume. Below are some of Richard Moran's that I researched when undertaking both set study briefs and commissioned work.


Year 3 Metaphor brief (Professional studies)
I enjoyed this brief as it enabled me to incorporate pieces of literature that have held meaning of sentimental worth to my self through my personal life journey and join it with my photography journey which has been a new chapter in my life. Below is some of the research that I conducted prior to taking my images that helped to shape and create the final images that I exhibited at the Brick Croft Nature Reserve in Longton.
Research

The below quote is what I could relate to as that has been my method of working for this project I like to find something that is interesting or beautiful to the eye, I am not happy unless my work has element of this and once I have taken my image there are always ways of enhancing or exaggerating the said elements in post production. Wayne Cosshall has been a landscape photographer for 35 years, the reason that I have included his work in my blog is that I like his take on the landscape imagery which is " Landscape photography is along, well established part of the photography tradition. It involves the exploration of the physical world with camera in hand and mind looking either for interesting, unusual, beautiful or strange and the photographing of it, or find something that can be turned into one of these using in camera / and or post production techniques".
 This is Wayne Cosshalls macro photography of rocks and crystals the parts of the landscape that really caught his eye are greatly magnified in the viewfinder . As a lover of Macro photography I really like this image and what he has done with it in post production.
Tom Nicholls is a photographer who takes wedding documentary and landscapes he feels that taking pictures is about telling a story without becoming a part of it, He was mainly based in London but has moved up to Cheshire.
The reason that I have included his work as part of my research is that I really like image and it has inspired me to a try new a direction of photographing my images as was always looking up at what was around me to capture, however after seeing this image I started look at was on the floor to capture.

I really like the isolation used within this image I feel that the loneliness of the single tree makes the image to the viewers and enables them to appreciate the shaping of the tree,
Brian Kosoff lived in Manhattan and had a successful Photo studio, Kosoff wanted a change of lifestyle and a different style of photography. He shifted to landscape photography with a style of self expression, he likes to highlight natural untouched beauty and I feel that this image captures this.
He produces all his own images in his dark room and he likes to create a sense of romance and mystery to his final printed images, Brian Kosoffs work is described as "having a painterly feel". (Kossoff.com/biography.asp). I would suggest that this description is evident in his work.
http://www.onlandscape.co.uk/2012/01/featured-photographer-hugh-webster/
This is quite a large article so I have attached the link for anyone who may fancy reading this, I found this article very interesting to read, it is Hugh Webtser's biography on his experiences of being a photographer. I found reading this very inspiring as it highlighted that he too felt the same challenges and journey of learning as I am experiencing.
He too has had moments of doubt of whether or not photography should be his long term career and he has also struggled to find new inspirations and image ideas.
I can fully relate to what he has expressed through out this article especially the long time it takes to get your head around using new equipment.

This is one of Hugh Websters images I really like the use of colours and reflection of the tress I feel that the viewers eye are drawn in and are kept busy whilst observing the natural beauty.
I like the separation of colours in this image and I feel that they contrast well.

I really like the use of black and white for this and as a fan of black and white for my own production of photography I feel that it adds to the mood and feel of the image. The nature of the image highlights the strength and beauty of the tree rather than it being quite mundane and a standard tree. The branches kind of articulate a pattern within the image which makes the photograph more interesting to the viewer.


The title of this image is St-Mirran's Grave Yard and Birches which I feel is a very fitting title the eeriness of the image made me think of an isolated grave yard before I had even seen the title. I feel that the mood has been captured and the use of colours contrast very well adding to the aimed portrayal for the viewer.
My Brief Final Images
Abstract Tree

The reason that I like this image is due to how random the stump looks coming out of the lake, also I feel that the reflections help to create a sense of mood within the image.
Bluebell

This image was taken using a Nikon D700 105 mm focal length, f.4, 1/100 sec.
Lady bird on flower
 |
| Ladybird and flower Mark Neylan 2012 |
The photograph was taken with 105mm focal length, f3.3, 1/3200 sec, ISO 200.
Dew on grass

Sunrise over water

This was taken using a Nikon D700 24-70mm focal length, f22, 1/6 sec ISO 200.
Ladybird

I like the use of colours within this image and the how the colours mingle and blur into each other.
Feather

The contrast of the colours helps the feather stand out visually.
The image was taken using a Nikon D700, 105mm focal length, f8.0, 1/400sec.

This is one of my final images as I really like the brightness of this image I feel that it is very inviting to the viewers eye as it instantly captures the eye.
I feel that the dew helps to show the freshness of the flowers and the yellow helps to draw the eye into the centre of the image.
This image was taken using a Nikon D700, 105 mm focal length, f.14, 1/100 sec.

This is one of my final images as I like the colours of this image and the use of shallow depth of field.
This image was taken using a Nikon D700, 105mm focal length, f2.8 1/400 sec ISO 200.

This is one of my final images as I really like the bounce of reflection from the sun in the top foreground of the image, I also like how the tress all link up to each other with the extension in their branches. I feel that the contrast of the colours works very well in setting the scene.
This was taken using a Nikon D700, 105mm focal length, f2.8 1/13 sec ISO 200.
Exhibition which is at The Brick Croft
I asked if I could exhibit the work for a two week period and the venue liked the work that much that they asked if they could exhibit it for the whole of the summer, which was very pleasing to hear.


Contact sheets


Final Exhibition Images
For the final exhibition we collectively decided as a group that we wanted to exhibit our work at the Red Church Gallery (London). In order for this to happen and be successful, we discussed who would take on each task and met up on a regular basis to communicate and share information about how each person's task was going and how we could further improve each task in order for the success to move forward, the brochure (designed by Helen Neylan creation of montage of the groups work) is accessed by the following link http://wwwgalleryinredchurchstreet.com/whats-on.php

The London 12 Exposures Brochure that has been created in collaboration with Bethany Scott


For my exhibition piece I chose to do Landscape images from Bolton Abbey through to Dent in the Yorkshire Dales National Park. I wanted to do landscape as I felt that I wanted to diversify my genre, also I did landscape images earlier in my degree and I wanted to re challenge myself and track any progress in my skills as a photographer from then to now.
Prior to taking my images I researched two well known landscape photographers these are Joe Cornish and William Turner.
Research Findings

The first person that I conducted research on was Joe Cornish (above) who is a landscape photography and lives in North Yorkshire. Since 1986 he was a travel photographer and his work has been published in 30 travel books, in 1991 he moved to Alaska and worked with Raliegh International as an expedition, this created Cornish's inspiration for places of wilderness.
In 1993 Cornish moved to North Yorkshire and started to take his images on a wide angle camera, his model was Horseman SW 612 then shifted to 5 x 4 this final shift is what Joe Cornish is known best for, much of his landscape is published and used by The National Trust. (www.joecornishgallery.co.uk).
Joe Cornish I felt was an imperative person to research for my landscape due to both his ties to North Yorkshire and the style of his landscape work was very much what I inspired to recreate and capture in my own landscape images, please see below examples of Cornish's work.


This a Photograph that I took of a rainbow
The second person who I based my research on was William Turner again another imperative person in terms of my landscape images of Bolton Abbey.
William Turner (1775-1851), was a painter from Oxford who specialised in water colour landscapes, some of his paintings are still exhibited in the Ashmolean Museum Oxford. Turner joined John Varley in London and did his first exhibition at the Royal Academy.
Some of his paintings of Bolton Abbey are listed below.

This image looks as though it was painted from the same spot as I was stood when taking my below image.


Final Images for London Exhibition
Over the 3 months of intensively visiting the Yorkshire Dales, day on day week on week and the adverse weather conditions that we have been unfortunate to have had so far this year, there has never been one occasion where the sun has come out when I have been on location. I had to deal with consistently low lighting conditions which proved very challenging indeed. Therefore in order to overcome the problems all images were taken using a weighted down Manfrotto heavy duty tripod, my Nikon D700 with a shutter release control cable to again reduce any shaking, and it was necessary to employ a long shutter speed in all images so that I could achieve the deep depth of field that I wanted in my images.
This is my photograph of Bolton Abbey, I used a 24-70 mm lens, Nikon D700, I used a tripod to lessen the camera shake and due to the light levels being so bad I had to use a slow shutter speed.
I like this image as I feel it captures not only the beauty of the remaining Structure of the Abbey but the beauty surrounding the Abbey too, by incorporating the view. The colours are also contrasting well against each other and by the Abbey being set on the hill I feel that it gives it a feeling of grandeur.

I like the colours that are used in this image the purple that runs throughout the different subjects brings them together.
I also feel that the mood of desolate and abandonment is very visible a lonely feeling but the contrast of colours used within the image create a sense of beauty that is actually very old and rugged.

This image presents the Abbey from a different angle and I feel that its presents a whole new concept to the Abbey this is called the stepping stone and was created by layering in Photoshop, so that I could recreate the view that captured my eye..
The colour of the lake contrasts well with the colour of the Abbey with the greenery bringing life to it.
Although the Abbey is an old building I feel that there is a sense of purity within the final image, whilst the sky highlights the mood of history and upholds the secrets from past to present.

I like this image as I feel the continuation of the arches drags the viewers eye across the whole of the image.
The sky and the clouds contrast well the colours in the floor, with a very strong subject in the middle of the photograph.
The image was taken using same as above.

The dark sky helps to create a brooding presence and the twists of the random tree help to emphasise this.
Original Images


As you can see from the original images post production techniques have been implemented in order to capture what I felt my view of the landscapes was and wanted to pass this onto the viewers.
All images was cropped 16 x 12 so that they was all the same and I felt that this would be the correct size to display my images at, as they would be not too small and not too over facing for the clients/ potential customers.
All images were placed into light room and collectively toned to give them the same tonal range as base for my for my final post production techniques in Photoshop as would have been done in the dark room had I used film. Then in Photoshop I used a high contrast filter to create high definition then using curves I specifically picked out parts of the image to give either extra high contrast or lower contrast to.
Contact Sheets


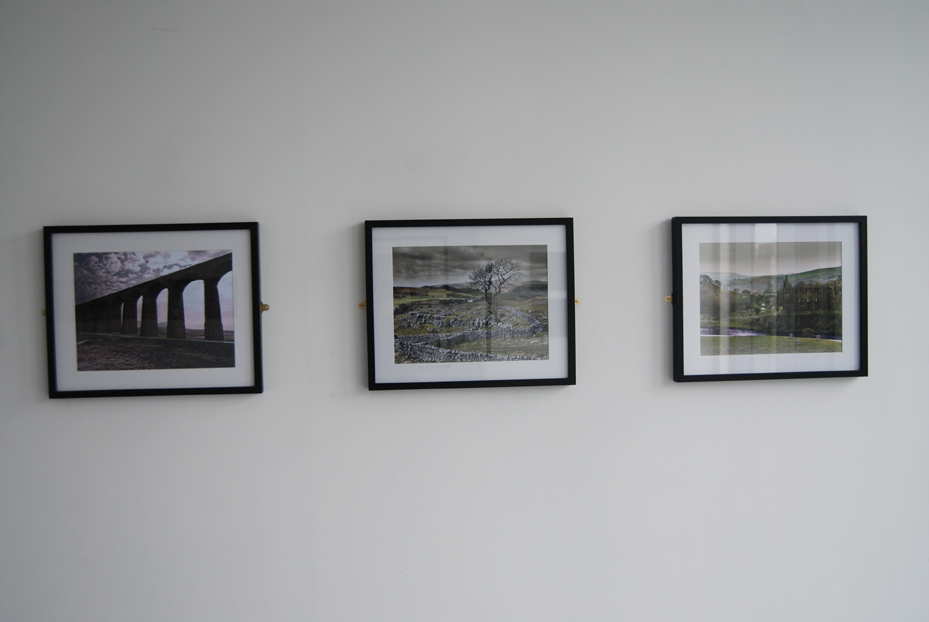
Exhibition at the Red Church Gallery in London
These are some of the images of the exhibition when it was being set up and when it was finished and open to the public.


Exhibition at Blackburn University - Currently showing
Here are some images of my work currently showing in the exhibition hosted by the faculty for the end of year show which I am very proud to have been a part of.


The Departments all colaborated and the Graphics team created this poster to advertise the show:

Conclusion
As stated in the introduction I have found the past 3 years rather challenging at times but now that I am at the end of my journey as a student, I am so pleased that I welcomed the set tasks and over come any fears or stresses that I felt at the time.
The biggest lesson that I have learnt through my said time is to never let the fears or worries effect your confidence in a way that would make you think that you can not do the work, and to accept every brief and commissioned tasks as a hurdle to overcome by striding to reach the end goal as this helps to increase confidence awareness and a further step up to becoming the level of photographer that you aim to be.
Further to this research is imperative to the work of a photographer as this add's to your quality of work in a number of ways which are as follows:
- Research explores new avenues into where various professional photographers have taken their personal inspirations from.
- Generates an insight into the meaning of photography by outlining where photography started and the historical uses and meaning's of photographs.
- Opens up various methods and in hand camera/ post production techniques.
- Helps you personally as a photographer to conduct market research into understanding the target audience therefore making your work more desirable to the customer.
- Helps you personally to understand that even the photographers at some point lost inspiration and had to find that element of photography that they can fully be at one with.
Published work and exhibitions
Producing work for customers and exhibitions can be very time consuming especially when it is location work rather than studio work. With studio work you can manipulate the setting, lighting and angles etc..... therefore the camera shoot time although still time consuming, is reduced rather dramatically when compared to location shooting.
Finding the perfect location is heavily researched pre-shoot, then once you have arrived at your location the biggest thing that I have learnt is that you can not predict the weather. Location photography/ field photography is a lot harder to manipulate settings to get the perfect image, and you can arrive with a predetermined mind set of the image that you are wanting to achieve and walk away with a complete different set of images.
I have found that determination is key to this type of photography and to keep returning to the same area over many different days/ weeks until you get the image that you are happy with or can work with is paramount to reaching your goal.
Also when using natural lighting you have to place plenty of thought of how you want the lighting to compliment your image and work your time scales around this, this too can increase number of journeys at different times of the day to the same spot.
However once you see your work published by the customer or hung up in an exhibition all that time and perseverance and sometimes out right annoyance and frustration turns into a great sense of achievement and an overwhelming sense of feeling very very proud and you then remember exactly why you have chosen to be a photographer as a professional career.
Student experience
I have enjoyed my time as a mature student and have enjoyed being a part of my group, we have been a very mixed group in terms of age and have been very diverse in terms of interests and photographers. However I feel that this is what has made the group work so well together.
Personally I have enjoyed taking that great sense of achievement in bettering myself and my career prospects and will miss my time with the group and tutor's, the biggest thing I have taken away from the course is to always listen to construction criticism and use it to guide you, never give up and never doubt yourself and your abilities always aim to take on new tasks that are going to challenge you and in turn increase your skills as a photographer.
If I had my time over again would I have chosen the same career step and become a BA Hons Photography student?, absoloutley!!!
I hope that you have enjoyed looking at my work on my blog as much as I have enjoyed creating it.
Chris Aughton TimeLine


+of+ART+NOUVEAU.jpg)
+of+ART+NOUVEAU.jpg)


Do you want Mainland Company Formation in Dubai - Company Setup Consultants will help you to setup your Mainland Company in UAE with minimum documentation.
ReplyDelete